How to Tie a Tie: A Step-by-Step Guide
Learning how to tie a tie is an essential skill, whether you’re dressing up for a job interview, formal event, or just want to polish your everyday look. There are various methods to tie a tie, but we’ll focus on the most common and versatile knot: the Four-in-Hand Knot. This method is perfect for beginners and works well with most types of shirts and tie styles.
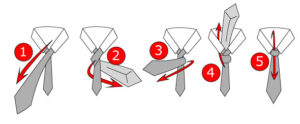
Step 1: Prepare the Tie
- Drape the tie around your neck with the wide end on your right side and the narrow end on your left.
- The wide end should hang about 12 inches lower than the narrow end. Adjust the lengths depending on the size of your torso and desired knot tightness.
Step 2: Cross the Wide End Over the Narrow End
- Cross the wide end over the narrow end, forming an “X” just below your chin.
- Hold the intersection of the tie (where the wide and narrow ends cross) with one hand to keep it steady.
Step 3: Wrap the Wide End Around
- Take the wide end and wrap it behind the narrow end, bringing it to the opposite side.
- Continue by wrapping the wide end back over the front of the knot, keeping the fabric flat and smooth.
Step 4: Pull the Wide End Through the Loop
- Once the wide end is wrapped around the narrow end, pull it up through the neck loop from underneath.
- Hold onto the wide end as you work it through the loop.
Step 5: Slip the Wide End Down Through the Knot
- After pulling the wide end through the neck loop, slip it down through the front of the knot you’ve created.
- Tighten the knot by gently pulling the wide end downward while holding the narrow end steady.
Step 6: Adjust and Straighten
- Adjust the knot by sliding it upward toward your collar.
- Ensure the tie is snug but comfortable around your neck, and the wide end covers the narrow end.
- Straighten the tie and smooth out any wrinkles for a clean, polished look.
Tips for a Perfect Knot:
- Practice Makes Perfect: The Four-in-Hand Knot is simple, but practice will help you achieve a neater knot.
- Symmetry: Make sure the knot sits centered between your collar points for a balanced appearance.
- Choosing the Right Knot: The Four-in-Hand Knot is ideal for narrow collars, while more formal knots like the Windsor Knot work best with wide-spread collars.
Other Tie Knots to Explore:
- Windsor Knot: A wider, more formal knot, perfect for job interviews and formal events.
- Half-Windsor Knot: A more balanced knot, slightly smaller than the Windsor, but still formal.
- Pratt Knot: A versatile and symmetric knot that works well with most collar types.
Learning to tie a tie is an art, and once mastered, it becomes second nature. Whether you’re dressing for a special occasion or just want to elevate your style, a well-tied knot will always make a sharp impression.


Please tell me more about your excellent articles